To search for any recipe, use the search box at the top left of the page.


For any queries, emails welcome at julesdinnertable@yahoo.co.uk

laksa

laksa

Thursday 30 April 2015

Easy Re-Fried Beans

A big fan of Mexican food, one of the side dishes I love is re-fried beans. They are sold in tins here in England but its just so easy to make.

I created this recipe many years ago, on holiday with a group of friends. We were all staying in cottages in a place called Darley, Yorkshire and I was the only one of the group happy to cook. I made a deal with them. Being a vegetarian at the time, I suggested that I did ALL the cooking (great response) as long as it was vegetarian (not so great response). We were located in a place that had very few shops, but I happily went off shopping. In the five days we were there, I heard no complaints as they tucked into various veggie dishes. One of the nights was Mexican food, so one of the side dishes was a hot, garlicky, melting cheese topped dish of re-fried beans. I have stuck with the same recipe ever since and it is store cupboard staple too.


Ingredients:

1 400g tin cannellini beans, rinsed & drained
1 400g tin red kidney beans, rinsed & drained
1 small onion, finely chopped
3 cloves garlic, finely chopped
1 pint chicken stock
salt
black pepper
grated hard cheese or mozzarella

Method:

In a wide frying pan, fry the onion until translucent. Add the garlic for another 2 minutes and then add the two tins of beans with the hot stock. Bring to the boil and cook for 5 minutes.

Then, with a potato masher, simply mash the contents of the pan. Season with a little salt and lots of black pepper. Top with grated cheese and serve with the cheese melting lovingly over the delicious re-fried beans. Perfect!

Note: If you like it spicy - add a couple of chopped chillies with the garlic - I do!


Wednesday 29 April 2015

Chicken in Green Sauce with Penne

This is such a fresh, vibrant dish to cook. When you blend the peppers, spinach and coriander, the smell is just like walking through an English summer garden. And the vibrancy of the green sauce makes you feel you are eating health in a bowl. That happens to tastes amazing. I was actually excited cooking this, as it has to be my personal favourite flavour combination and I think you will love it!

There seem to be so many red sauces with pasta; occasionally white. Tomato, red pepper or cream sauce. Never had I had a decent, fresh green sauce unless it was just herbs. This is my Chicken in Green Sauce with Penne.


Ingredients:

2 large green peppers
260g spinach
25g coriander
3 cloves garlic,
1 onion, peeled and halved
2 tsp. oil
2 large chicken breasts, skin removed, chopped
1 tsp. sugar
2 tsp. salt
1 tsp. black pepper
1/4 tsp. ground nutmeg
120ml double cream
200g penne pasta
2 tbsp. natural low fat yoghurt
Handful walnuts, toasted in a dry pan & chopped


Method:

Cut one of the green peppers in half and reserve half for later. Then, either over a naked flame, or under the grill blacken the skin of the one and a half peppers and put into a freezer bag to steam for a moment. Peel away as much of the blackened skin as you can and discard the stem & seeds. Put the peppers into a food processor and add to it, the coriander, spinach, 2 cloves of the garlic and 1/2 onion. Process until fine. Add enough water (50-100ml) to make a loose paste.

Slice the remaining 1/2 pepper and chop the remaining 1/2 onion and finely chop the garlic clove. In a large frying pan, heat 1 tsp oil and gently cook the onion and pepper and garlic until tender. Add the pepper/spinach paste and cook on a low heat, adding a further 100ml water, the nutmeg, sugar and seasoning. Add more water if needed; you need a loose sauce, but not watery.

In a separate frying pan, heat the other tsp oil and fry the chicken on a high heat for 5 minutes or until beginning to brown. Add the chicken and juices to the pepper sauce. Stir through and add the cream. Taste for seasoning, adding more salt if needed.

Boil the pasta in a large pan, until just cooked (al dente) and combine with the chicken and sauce. Cook gently for 2 minutes and then serve with a spoon of yoghurt on top and a sprinkle of the walnuts. Delicious!


This is a sauce I used to make back in the days of being a vegetarian, so it also makes a great vegetarian pasta sauce (omitting the chicken) which is packed with flavour and also good with crumbled feta cheese over the top. Enjoy!

Tuesday 28 April 2015

Comforting Parsnip and Leek Soup

Yet another soup for you to try. I am a huge fan of homemade soup because its just so comforting and gives you so much more flavour than the tinned variety. It was last Sunday lunchtime when the weather was just on the wrong side of cold that was crying out for a warm, thick pair of socks and a large comforting bowl of soup with bread and butter.

Still having an excess of parsnips after having made parsnip mash and parsnip hummus, I pulled out a few more to make a delicious soup.


Ingredients:

3 parsnips, peeled and chopped
2 leeks, peeled and chopped
1 tbsp. oil
1 tbsp. butter
800ml vegetable stock (cube is fine)
100ml double cream
croutons, to finish
snipped chives, to finish

Gently cook the leeks and parsnips in a large pot in the butter and oil, on a low heat for about 10-12 minutes until soft. Add the stock and bring to the boil. Turn the heat to medium, cover with a lid and cook for about 1-15 minutes until the parsnips are tender.

Take off the heat and using a hand blender, blitz into a smooth soup. Put back on a gentle heat and add the cream. heat through stirring. Serve topped with the croutons and chives.


For the croutons, I used the standard seeded granary bread we had and cut them into cubes, tossed in a tiny bit of oil and popped in a hot oven for 3-4 minutes to crisp up.

Warming and comforting. And so very easy to make!

Monday 27 April 2015

Easy Authentic Rogan Josh

The one thing I try to stick to with these recipes are to find the healthiest way to cook them. I find a lot of Indian food cooked in the UK to be a bit too oily from the large amount of ghee that is used which is unnecessary. Also, the best thing for me about this dish, is that it uses a lean cut of meat so the fat is removed making this a very healthy curry. The flavour doesn't need to be from 'marbled fat' running through it - it is so packed with flavour from the spices you can use lean meat.

In fact this dish is also good with skinless chicken breasts. Here I have used lamb. Its warming a spicy and I love it.


1 inch piece fresh ginger, peeled 
3 garlic cloves, peeled
2 tbsp. water
2 tbsp. vegetable oil
500g lamb leg steaks, trimmed of any fat and diced
seeds from 5 cardamom pods
1 bay leaf
5 peppercorns
1 cinnamon stick
4 cloves
2 onions, peeled
1 tbsp. butter
1 tsp. ground coriander
2 tsp. chilli flakes
2 tsp. cumin seeds
2 tsp. paprika
1 tsp. cayenne pepper
1 tsp. salt
4 tbs. plain yogurt
100ml water
1 tbsp. garam masala
1 tbsp. dried curry leaves, crumbled
fresh coriander for garnish

Finely chop one of the onions and put in a bowl. In a hand blender, puree the other onion and add it to the bowl. Put onions to one side. In hand blender, blitz the garlic and ginger with 2 tbsp. water to make a paste. Put to one side. In a pan add 1 tbsp. of oil and fry the lamb cubes until browned. Remove from the pan and set to one side.

In the same pan, add the bay leaf, peppercorns, cloves and cinnamon stick with a further tbsp. oil. Cook until the bay leaf is beginning to brown and then add the chopped and pureed onions along with the tbsp. butter. Cook for 5-10 minutes on a medium heat until browned. Then add the garlic/ginger paste and continue to cook for another 5 minutes. Now add the meat and resting juices back to the pan and stir fry for 1 minute.

Add one tablespoon of the yoghurt and stir in. Then add another, until 4 tbsp. have been put in. Combine well and then add the water. Bring to a boil and then simmer on the lowest heat for 2 hours, stirring occasionally. You may need to top up the water if its drying out.

After the 2 hours the lamb should be melt in the mouth soft with a thickened sauce. Add the garam masala and the curry leaves and stir through for last 5 minutes of cooking.


Serve with basmati rice and fresh coriander. And a naan bread of you like. Delicious!


Mango Cake with Mango Buttercream Filling

I have had a large tin of mango puree in the store cupboard for quite a while, that was kindly given to me. I had intended on using it in a savoury dish but hadn't got round to it. So I decided to make a mango cake - its really easy too.

I used to dislike mangos up until I was sitting at breakfast one morning in Tenerife and had some fresh mango for breakfast, which was juicy, sweet and just divine! I have never looked back. Now, I don't know why, but I rarely see mango cakes. It is now probably my favourite fruit and I think there needs to be more mango recipes out there. I plan to experiment this week.


Ingredients:

170g butter
225g caster sugar
3 eggs
1/2 tsp. vanilla essence
180g self raising flour
2 tsp. baking powder
1 cup tinned mango puree (about 400g)
 
 
Set the oven to 160 C and line a greased loaf tin with greaseproof paper.
 
With a hand mixer, mix the butter and sugar on high until light and fluffy. Add the eggs, one at a time and incorporate. Add the vanilla essence. Fold in the flour and baking powder and then stir in the mango puree to make a batter. Pour the batter into the prepared tin and cook for about 1 hour, checking occasionally. The cake is ready when you put a skewer in the middle and it comes out clean. Leave to cool in the tin for 10 minutes, then turn out onto a wire rack to cook completely.


For the buttercream filling:
 
225g butter, room temperature
125g icing sugar
1/2 cup (about 200g) mango puree.
 
Beat first the butter and then add the sugar in, a bit at a time. Keep beating and then add the mango puree until incorporated. If it is too thin, add some more icing sugar. The buttercream will firm up in the fridge. (Notes on buttercream at the bottom of this page).
 
Cut the cake in half lengthways and spread the butter cream on both inside levels. Put in the fridge to firm up a little and then press the top gently onto the bottom, with the buttercream touching. Dust with icing sugar to serve.


Slightly ironically, the day after I made this I managed to snag a bargain of 8 large mangos for £2.79 in a local food store! So now I have to get my thinking cap on to use them up.
 
 
Note: Troubleshooting buttercream. If the butter won't incorporate, its probably because the butter is too cold. Scoop a few spoon of the mix and heat in the microwave. Then add that back to the main mixture and beat together. If the buttercream splits, it usually means you need to use a higher strength beater. Put the mixture into a tall pot and use a hand blender. You should get perfect smooth buttercream.


Sunday 26 April 2015

Bbq Chicken Skewers with Avocado & Courgette Salad

With the weather getting slightly better I am really looking forward to pulling the barbecue out of the shed so we can sit outside, cook and enjoy. Sadly though, it looks much nicer than it actually is. So I keep on hoping and making food perfect for the barbecue and then realising we have to eat it indoors yet again. I remain hopeful!

In the meantime here is Bbq Chicken Skewers with a light avocado, courgette and lime salad.


Ingredients for the chicken:

2 chicken breasts, skinless and cut into large cubes
4 skewers (wooden or metal)
2 tbsp. packed brown sugar
1 tbsp. paprika
1/4 tsp. dried oregano
1/4 tsp. dried basil
1/4 tsp. dried sage
1 tsp. cayenne pepper
1/4 tsp. salt
1/2 tsp. black pepper

Mix the marinade ingredients in a bowl and add the chicken cubes. Marinade from 1 hour to 1 day in the fridge and then thread onto the skewers. Grill for about 8-10 minutes, turning frequently.

For the avocado & courgette salad:

1 small avocado, peeled and chopped
1 courgette, grated
zest and juice of 1 lime
2 tsp. black poppy seeds
2 tbsp. olive oil
1 tbsp. honey

Put the grated courgette onto a clean tea towel and add 1/2 tsp. salt. Leave for 30 minutes and then wring the excess water out by twisting the fabric tightly over the sink. Add the now drier courgette to a bowl and add the other ingredients. Mix well and leave to marinade at room temperature for 10-15 minutes.


Serve with a couple of flatbreads for a delicious fresh and healthy bbq chicken kebab.
Enjoy!


Easy Mexican Spicy Baked Eggs

This is an adaptation of the Mexican Huevos Rancheros which is generally a fried tortilla,  topped with a spicy tomato salsa and a couple of fried eggs. Here I have just removed the 'fried' part to make a quick, healthy, filling Sunday morning breakfast with a nice spicy kick!

The chilli sauce that you add can be any type you like. I used my Chipotle In Adobe sauce, (recipe here) - but you can use any kind you choose.


Ingredients:      (Serves 2)

1 tsp. olive oil
1/2 white onion, thinly sliced
1/2 red pepper, thinly sliced
400g tin chopped tomatoes
1 tbsp. good chilli sauce
4 eggs
fresh coriander, to serve
1 chopped green chilli, to serve
4 flour tortillas

Method:

Gently cook the onion and red pepper in the oil in a small pan until soft. Add the tinned tomatoes and stir. Add 1-2 tbsp. of a good chilli sauce and cook on a medium heat to thicken slightly. Season with salt & a grind of black pepper. Put into a shallow dish. Make four wells in the tomato salsa and gently break an egg into each hole. Pop in the oven for about 15 minutes or until the white looks set.


Warm the tortillas up in the microwave for about 1 minute and serve with the salsa and egg in the middle (see serving picture at the bottom of this page). Top with fresh chopped coriander and the green chilli. Eat while still steaming hot!

Saturday 25 April 2015

Roast Tomato Bread

This is one of those recipes that will come in handy if you found you have bought too many tomatoes (which I did last week) or in the summer when you are growing tomatoes and you have a glut of them (most years). In panic, when I see them getting over ripe, I have to think quickly on a way to save them. I have a few things that I do with a glut of tomatoes and this is one of them. I roasted them. And made tomato bread.
 
They were rather large tomatoes so I cut them into wedges, but if they are cherry tomatoes you can leave them whole or cut them in half. Toss them in a little olive oil and a dash of salt and pepper and put them into a hot oven (about 200 C) and roast until they have lost most of their liquid and have started to blacken. How long depends on the size of the tomatoes, but these took about 45 minutes. Then leave them to cool and put into a freezer bag. At this stage you can just freeze them as they are for future use, or you can make a delicious pasta sauce. In this case I froze half for a later date and used half in my Roast Tomato Bread.


I used this basic bread recipe:
 
500g strong white flour
7g sachet fast-action yeast
1 tsp. salt
3 tbsp olive oil
300ml water
 
In a bowl, mix the flour, yeast and salt. Male a well in the centre and add the oil and water and knead into a dough. Leave in the bowl in a warm place in the house to rise for 1 hour.
 
Then knock back the risen dough and mix about a cupful of the roasted tomatoes into it. Mix in well and then make into a ball and put on a greased baking tray to cook at 210 C for 20-25 mins. I also put some into flower pots (which looks so pretty).
 
To do that you need to grease the (clean) flower pot and line with greaseproof paper. Then pop in the oven for 20 minutes. Perfect, tomato bread to have with just about anything. Enjoy!


Thursday 23 April 2015

Grilled Mackerel with Leek & Walnut Couscous

I have quite a few mackerel recipes that we like to try. It is one of those fish that seems to carry all sorts of  punchy flavours alongside it like horseradish, beetroot and chorizo to name but a few.

Its an oily fish with a rich source of omega 3 fatty acids which is good for normal metabolism and so, rather good for you. As it is oily, I like to simply grill it rather than pan fry; which I have done in this recipe and served with a couscous with leeks, green peppers, apricots and walnuts with a simple yoghurt sauce on the side and a little coriander pesto.


Ingredients:

2 mackerel fillets
1 leek, sliced
1/2 green pepper, sliced
1 clove garlic, chopped
1/4 cup semi dried apricots, chopped
1/4 cup walnuts, roughly chopped
1 cup couscous
1  pint chicken stock

Gently pan fry the peppers, leeks and garlic for about 10 minutes or until vegetables softened. In a bowl, add the hot chicken stock to the couscous and cover with cling film to let steam for 5 minutes. Add the vegetables to the couscous, along with the apricot and walnuts.

Set the grill to high and cook the mackerel, first skin side down for 2-3 minutes, then turn over and cook the until the skin is crisp.

Serve the fish skin side up with the couscous on the side.

For the yoghurt sauce:

In a bowl, whisk 1 cup plain low fat yoghurt with 1 clove garlic, minced, the zest and juice of 1/2 lime,  a handful of chopped fresh coriander, salt & pepper.

For the coriander pesto:

In a hand blender, blitz 25g fresh coriander, 1 tbsp. of pine nuts, 3-4 tbsp. olive oil with a dash of lime juice.


Serve either one of the sauce, or both as I have, with the fish and couscous. Very healthy and very tasty!


.

Ensalada Rusa (including Vegan version)

This is a Spanish tapas dish that I had in the Canary Islands (think it was Tenerife). It is also called Olivier Salad and originates in Russia, but is also served in Spanish countries.

It is so simple, but so different to the usual tuna salad I have had in the past. Its a perfect little side dish to other tapas like sizzling garlic prawns and crusty bread.  Served in the garden with a newspaper and a glass of Rioja!

You can make this vegan using vegannaise which is a vegan mayonnaise,. You can buy Granovitas' Mayola in stores - or make it yourself using the recipe at the end of this page) and instead of tuna and egg, add chopped beetroot, pequillo peppers and green beans. Just as delicious.


Ingredients for tuna version:     (Serves 2-4)
1 x 160g tin tuna, drained
1 medium carrot
4 small new potatoes
1/2 cup frozen peas
150g mayonnaise
2 eggs, hardboiled & peeled
few chives for garnish

Method:

Boil the potatoes whole until tender and remove from the water with a slotted spoon, reserving the water in the saucepan. Leave to cool, peel and chop into small dice. Put into a medium sized bowl.

Chop the carrot into pea size dice and add to the potato water. Cook for ten minutes adding the frozen peas to the carrots for the last 2 minutes. Drain and add to the potatoes. Chop the hardboiled eggs. Put in the bowl with the cooked vegetables along with the drained tuna and mayonnaise. Mix thoroughly.

Lightly season with salt & pepper and stir in. Top with the chopped chives and serve at room temperature with lots of crusty bread.

For the Vegan version:

Make as above but instead of the tuna and egg, add a handful of steamed fine green beans, chopped, some chopped beetroot and sliced pequillo peppers. The vegannaise can be bought in stores but here is a recipe for that also.

Vegan Mayo   (Makes 1 1/2 cups)

Ingredients:
 
1 cup firm silken tofu
1 tbsp. cider vinegar
1/2 tsp. English mustard
1 tbsp. caster sugar
juice of 1/2 lemon
1/2 tsp. salt
1/3 cup olive oil
 
Put all of the ingredients into a blender and mix until you get a light, thickened creamy mix. Now use in the recipe above and you have a Vegan Ensalada Rusa. Delicious!


Wednesday 22 April 2015

Trinidad Roti and Channa Aloo with Coleslaw (V)

This is a terrific Vegetarian (Vegan but for the coleslaw) dish which is so comforting and so full of flavour that you don't miss having meat. It is a bit of a mix really. This is a dish that you would get in the Caribbean, but I have also made a Madras spice which would be from South India. In fact, a Madras typically in India would be Hindu and usually vegetarian. As always, you can easily buy Madras spice mix in the shops; for those who like curries as much as I do - its worth making it yourself. I have put the recipe at the end of this page.

The Channa (chickpea) and Aloo (potato) curry is simple to make and packed with flavour. The roti is a bread that is from India and is also eaten in Trinidad and Tobago and Guyana to name but a few. You can also buy roti fairly easily, but with only a few ingredients - its easier to make. I made this one as a low carb version with chickpea (gram) flour.

In this recipe I have made a slight Caribbean flavour - as it would be served in Trinidad - using scotch bonnet chillies and coleslaw side. Absolutely beautiful food.


For the Channa Aloo Curry

2 tbsp. madras curry powder
1 small onion, sliced thinly
3 cloves garlic, minced
1 scotch bonnet chilli, seeds removed and chopped finely
2 medium potatoes, peeled and cubed (about 1cm)
1 400g tin chickpeas, rinsed and drained
6-8 dried curry leaves
water
bunch coriander, chopped

Mix the 2 tablespoons of madras powder with 2 tablespoons of cold water. Mix into a paste. Heat 1 tbsp. oil and add the curry paste. Cook for 2 minutes until the water evaporates. Add the a further tbsp. of oil and the onion, garlic, chilli and chopped coriander (stalks only at this stage). Stir through and add 2 tbsp. water.

When the onions are brown and the liquid evaporated (about 4-5 minutes), add the chopped potato and the chick peas. Stir well and then add 2 cups of water, the curry leaves and season with salt and pepper. Bring to the boil and then turn to a medium heat, uncovered, to thicken. You want it to be fairly thick so you can stuff a roti and be able to cut it in half on a plate without the sauce running everywhere, but don't make it too dry. Leave it bubbling until thickened nicely. Finish with the chopped coriander leaves and stir through.

Lay a roti on a plate and fill the middle length with the curry. Roll up and cut in half. Serve with the coleslaw (recipe next).


For the coleslaw:

Shred 1/4 white cabbage and mix with 1 thickly grated carrot and 1/2 thinly sliced red onion. Whisk together 1 cup. mayonnaise, 2 tbsp. sour cream, 1 tsp. mustard powder, 1/4 tsp. celery salt, 1 tsp. sugar and 1 tsp. white wine vinegar. Pour over the vegetables and stir in well. Cover and chill until needed.

For the roti:   (makes 4)

1 cup chickpea (gram) flour
2 tbsp. all purpose flour
1 tsp. baking powder
1 tsp. ground turmeric
1/2 tsp. salt
approx. 1/2 cups water.

In a bowl, mix the flours, baking powder, turmeric and salt. Gradually add the water to make a pouring batter. Heat a frying pan with 1 tsp. oil and pour in about 1/4 batter, turning the pan to cover the whole base. After a minute or two when the batter begins to bubble, carefully use a spatula to turn the roti over. Cook the other side until golden and set to one side. Keep cooking the roti until all the batter is used. You should have four.


For the Madras Spice Mix

2 tbsp. coriander seeds
2 tbsp. cumin seeds
1 tsp. brown mustard seeds
1 tsp. fennel seeds

1 tbsp. ground cinnamon
2 tbsp. ground black pepper
1 tsp. whole cloves
2 tsp. ground turmeric
2 tsp. ground ginger
1 tbsp. cardamom pods, then seeded (discard shells)
1 tsp. cayenne pepper

In a dry frying pan, toast the first four ingredients until the popping of the mustard seeds begin to subside (be careful not to burn). Then put the toasted seeds into a hand blender and mix the remaining ingredients. Grind till you have a powder. Put into a sealed container until needed.


Parsnip Hummus

Being the end of the season for parsnips, I got two huge bags of parsnips very cheaply this week, so am finding ways of using them up. Am thinking of a parsnip soup maybe later in the week. But the weather was so lovely for the last few days that I decided to sit in the garden with some bread and my home-made Parsnip Hummus.

Its creamy and slightly sweet, with a tang of lemon and garlic and works well as a spread in a sandwich with some nice ham too!


Ingredients:

3 parsnips, peeled and cut into cubes
1 tsp. ground cumin
1/2 tsp. ground coriander
1-2 cloves garlic, crushed
1/4 tsp. salt
3 tbsp. tahini
juice of 1 lemon
1 tbsp. sour cream
4 tbsp. olive oil
grind of black pepper


Method:

 
Cook the parsnips in a small pan gently, with the cumin & coriander in just a dash of oil and a little water until parsnips soft and drain well. Put into a hand blender with the garlic, salt, tahini, lemon juice and sour cream. Blend until smooth. Now add the olive oil a tablespoon at a time, blending in between each tablespoon to get a thick, smooth consistency.
 
Season to taste and sprinkle with cayenne pepper and serve with flatbreads. Delicious and a great change from the usual hummus!


Tuesday 21 April 2015

Ethiopian Spiced Chicken Meatballs with Linguine

The Ethiopian spice mix, Berbere, is so good that I decided to try it in a completely different dish. Inspired by a John Torode recipe where he uses Indian spices in meatballs (delicious) - I have tried it with my favourite spices. The recipe to make the Berbere Spice is at the bottom of this page.

Berbere is usually used in an Ethiopian curry I often make called Doro Wat (recipe earlier on this blog). Its unfortunately not found in many supermarkets but you can find it in spice shops or online. Either way - I make it myself, so have added the recipe. Its amazing and makes an awesome curry. Here I have used it to flavour the meatballs. Lovely.


Ingredients:

2 large chicken breasts, skin removed
1/4 cup Berbere spice mix
1 onion, chopped finely
1 clove garlic, chopped
2 tbsp. vegetable oil
100g white breadcrumbs
50ml milk
200ml cream
1 tsp. lime pickle
200g linguine
chives for garnish

Method:

Fry the onion, garlic and spices in 1 tablespoon of oil on a low/medium heat until onion cooked and spices fragrant. Put into a bowl to cool. Mix the breadcrumbs with the milk and add to the onions. Using a hand blender, blitz the chicken breasts until well chopped and mix in with the spiced onion mix. Combine well and make into small 1 inch meatballs.

Boil the linguine in a large pot of boiling water until cooked. Heat the second tablespoon of oil and fry the meatballs on all sides until browned and lower the heat. Add the cream and stir well. Add the lime pickle and season with a little pepper.

Serve the meatballs on the pasta and garnish with snipped chives. Enjoy!


Berbere Spice Mix

I think its always good to have a great selection of herbs and spices in the store cupboard. I ensure I always have the list of ingredients for Berbere Spice Mix as its so hard to buy and so easy to make. And it stores well in a dry cupboard.

2 tsp. coriander seeds
1 tsp. cumin seeds
1/2 tsp. fenugreek seeds
Seeds of 4 cardamom pods
4 cloves
4 dried red chillies, broken into pieces

3 tbsp. paprika
1 tsp. ground all spice
1/2 tsp. salt
1/4 tsp. nutmeg
1/2 tsp. ground ginger
1/4 tsp. cinnamon
1 tsp. turmeric
Method:

With a dry hot frying pan, toast the seeds - down to and including the cloves and chillies. Shake the pan and ensure it doesn't burn. Tip into a bowl to cool a little. Now using either a hand mixer or a pestle and mortar, blend (or crush) until ground. Add the rest of the spices and stir together. You have your spice mix!


This recipe makes about 1/2 cup. You can use 1/4 cup in this recipe and make a curry with the rest another night! Enjoy!

Monday 20 April 2015

Home-made Peppercorn Sauce for Steak

Having two delicious looking fillet steaks to cook for dinner last night, my mind was in a whirl with different way to cook it. And after much consideration I decided that myself, like most people, just like a steak to be a steak. Pan fried, medium rare, with chips, peas and a perfect sauce on the side.

Peppercorn sauce has long been my favourite and I have tasted many types (from the sublime to the ridiculous!). This is the one we make at our house.


Ingredients:

1/2 onion, finely chopped
2 tbsp. whole black peppercorns
1 tsp. oil
25ml sherry (we used sweet, but you can use dry if liked)
75ml brandy
25ml beef stock (cube is fine)
large pinch ground black pepper
50ml double (heavy) cream


In a small bowl, mix the brandy and sherry together. Sweat the onions and the peppercorns on a low heat for ten minutes until onions cooked and peppercorns slightly softened. Pour half of the brandy/sherry mix into the pan and put the other half in a ladle, which has been warmed over the flame. Set light to the ladle full of alcohol and add to the pan to flambé. Be careful! When the flames subside, add the stock and ground pepper. Stir well.

On a medium heat simmer to reduce by half and then add the cream. Stir through. If making steaks at the same time, the steaks should be resting in foil beside you. I tend to pour the resting juices from the meat into the sauce, which ties the flavours in beautifully.

Serve the steak with the sauce on the side. Delicious!


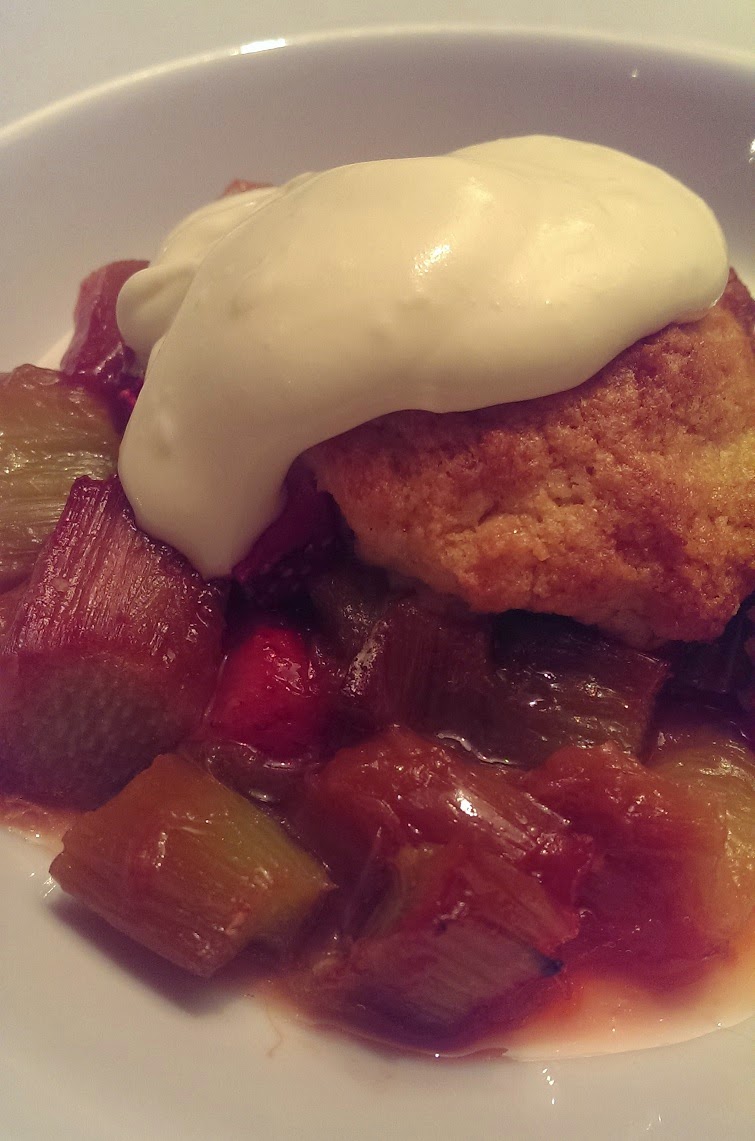
Rhubarb & Strawberry Cobbler

We've been growing rhubarb in our garden for about 4 or 5 years and I have to say, it is the easiest thing to grow! It starts growing in April and keeps giving right up until the end of September. Then it sits quietly in the soil waiting for spring. I currently have rather a lot so I decided to make a dessert last night to go with some strawberries that I had in the fridge looking a bit over ripe.

This sweet cobbler I usually make with blueberries; this was SUCH a refreshing change. A cobbler is from the United States and England and can be either sweet or savoury - I like both. Here I have made my Rhubarb and Strawberry Cobbler.


Ingredients:

500g rhubarb, chopped into inch pieces
small punnet strawberries, quartered
140g sugar, plus 40g
200g plain flour
2 tsp. baking powder
85g butter, cubed
200ml double cream

Method:

Set the oven to 190 C. Put the rhubarb into a saucepan with 140g sugar and a tiny splash of water. Cook for about 5 minutes, so the rhubarb cooks a little, but holds its shape. Drain and put into a 9 inch pie dish. Mix in the strawberries. 

In a bowl, mix the flour, baking powder and 40g sugar. Rub the butter into the flour mix until it looks like large breadcrumbs. Stir in the cream - it should look like a loose, shaggy dough. Spoon small mounds of the dough, scone sized over the fruit. Don't cover all of the fruit as you want them to bubble up between the cobbler. Bake for 30 minutes until bubbling and golden and serve with softly whipped cream.


This dish is also delicious served cold with ice cream. Its a summery delight!

Sunday 19 April 2015

Spanish Pork with Pea Puree & Pea Shoots

I think the first time I heard about pork cheeks was relatively recently, possibly only in the last couple of years. Chances are, it was on a cookery show like Masterchef and I assumed that they were an expensive cut of meat. It seems I was wrong. A pack of four cheeks (a meal for two) costs £2.50. Put that together with the vegetables, you could actually serve this as an impressive main course for a dinner party of four for under £10. I think that's pretty good! Not only is it a cheap dinner party meal, but it can all be pre cooked and ready to serve, so you aren't stressing to get things ready when guests are having their first drinks. Perfect!

Here I have cooked them slowly in a sherry based sauce and they were melt in the mouth delicious.


I had the potatoes cooked and mashed, ready to be re-heated, the pea puree cooked, pureed and ready to be re-heated. And the slow cooked meat can be taken out of the casserole, the sauce blended, put into a small pan and the meat popped in the sauce, also to be reheated. All you have to do is plate up and serve to delighted and hungry guests.

Ingredients:     (Serves 4)

8 pork cheeks
flour, for dusting
1 tbsp. olive oil
10 shallots, peeled and halved
1 carrot, chopped
1 small red pepper, chopped
2 cloves garlic
200ml sweet sherry
500ml beef stock (cube is fine)
1/2 tsp. dried thyme
2 bay leaves
1 tbsp. honey
1 apple, chopped

For the pea puree:
2 cups frozen garden peas
2 tbsp. olive oil
juice of half a lemon
salt & pepper

Method:

Dust the pork cheeks with flour and heat the oil in a flame proof casserole dish. Seal the meat on all sides to brown and remove from the pan. Set to one side. Add the shallots, carrot, red pepper and garlic to the same pan (add a tiny bit more oil if needed) and cook for 10 minutes until beginning to brown. Add the sherry to the vegetables and turn up to high to reduce by 50%.

Add the meat back to the pan along with the beef stock, honey, thyme, apple and bay leaves. Stir and put into a low oven at about 170 C for 2 hours, checking occasionally to turn over the meat .

To serve, take the meat out of the sauce and pour the sauce into a hand bender. Blend until smooth and put into a small pan on a low heat. Pop the meat in to keep warm while you make the pea puree.

For the pea puree:
Boil the peas for 3 minutes until cooked. Drain well and put into a hand blender with the olive oil, lemon juice and generous seasoning of salt & pepper. Blitz until smooth.

I served the pork on a bed of mashed potatoes with the pea puree and some pea shoots. Delicious!


No Comment?

To all readers who have told me they can't seem to comment on the recipes - apologies. I am looking into this and hopefully will be sorted soon.

Please note, if you have any comments or queries, please email to julesdinnertable@yahoo.co.uk

Happy Cooking!

Jules

Saturday 18 April 2015

Chicken Chow Mein (Step-by-step guide)

This is a recipe with a step by step guide on how to make an authentic delicious homemade Chicken Chow Mein. The word means 'fried noodles', chow meaning 'fried', mein meaning 'noodles' and is a Chinese dish popular throughout Britain, the United States and India.

It really is very simple to make as it takes about 5 minutes to cook - its all about the preparation. There are six easy steps to the preparation for this dish, which takes no more than 15 minutes and one you have them all ready, you're good to go whenever you are hungry.


Ingredients:    (Serves 2 large portions)

2 medium chicken breasts, skin removed
1 tbsp. sake (Chinese rice wine)
3 tbsp. soy sauce
1 tsp. cornflour (corn-starch)
1/4 cup (60ml) chicken stock (use 1/2 stock cube)
1 tbsp. hoisin sauce
large pinch of pepper
2 spring onions (scallions)
1 small carrot
1/2 green pepper
100g mange tout
handful cooked small prawns
1/2 onion
2 cloves garlic
1 red chilli
inch piece garlic
120g medium egg noodles

Step 1:
In a small container put the 1 tablespoon of Sake, 1 tablespoon of soy sauce, the teaspoon of cornflower and whisk together. Slice the chicken and add to the marinade. Sir together. This is the chicken and marinade. Set to one side

Step 2:
In a separate container mix the chicken stock, the remaining 2 tablespoons of soy sauce, the hoisin sauce, pepper and stir together. This is the sauce for the dish. Set to one side

Step 3:
Slice the spring onions. Put the green part into a bowl. This is the garnish. Set to one side.

Step 4:
Put the white parts of the spring onion in a container and then slice the carrot, mange tout, onion and green pepper and add to the white part of the spring onion. Set the veg to one side.

Step 5:
Finely slice the garlic, chilli and ginger. Put in a separate bowl.

Step 6:
Cook the noodles in boiling water for 2 minutes and drain. Refresh in a colander under cold water to stop the cooking process and put in a bowl with a teaspoon of oil to stop them sticking.

You will now have six containers. The chicken marinating, the sauce prepared, the noodles cooked and the vegetables separated (below).

Garlic mix, Veg mix and Garnish
I love preparing all this and then getting on with something else in the knowledge that I can have a fantastic meal when I want that will be such a pleasure to cook as it takes five minutes!

Okay so now lets cook. In a wok or large pan, heat a tablespoon of vegetable oil (peanut oil is more authentic if you have it). Add the garlic, ginger and chilli and sizzle for 10 seconds. Add the chicken and its marinade and stir fry for 2 minutes. Add the container of vegetables and cook, stirring in the hot oil for a further 2 minutes. Remove the veg and chicken from the pan and put into a bowl.

Heat another tablespoon of oil in the same pan and add the noodles. Stir fry for 2 minutes and then push them to the sides of the pan leaving a space in the middle. Pour in the prepared sauce and mix in. Then put the chicken and vegetables back in the pan and stir all together. Add the cooked prawns to heat through for a minute. That's it!  Serve on a large plate topped with the green onion garnish and eat!


Note: The Sake wine is easy to buy in most stores nowadays and although you don't use much, it lasts for ages. Keep it to one side and you will find you get through it if you like dishes like this. Alternatively you can drink it the way it is meant to be drunk. Put the bottle in a bowl of hot water to heat up and drink it hot. Delicious!